All manipulations with invoices are done in Invoice Editor. You are able to customize every aspect of an invoice: from & to, invoice #, net terms, items labels and prices, taxes & discounts.

Header
In the first row, you can see from & to fields, along with invoice # and net terms. From field is derived from the info in Settings section, while To field is derived from the client's settings. To ensure full addresses are applied, make sure you fill all necessary information into your company and client's settings.
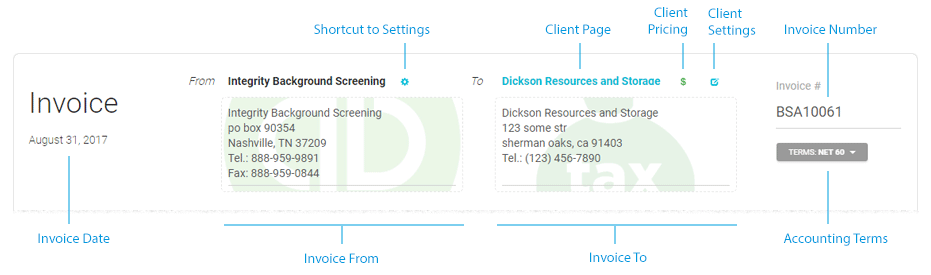
Each Invoice # is generated based on Invoice Settings .
There, you can change the way the invoice number is formed.
Net Terms could be specified on a client level. If the client does not have a specific value, default Net Terms from Settings will apply.
Items
Items section is formed by sets of searches grouped by applicant name as the top row. Name is followed by applicant's Social Security, name of person conducted the search, on which date, and file #.
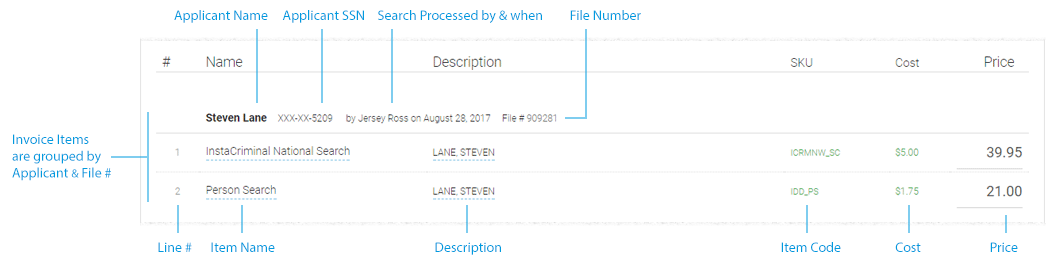
Name & Description can be edited by clicking on the text. Price can be set using the input on the right.
Discount lines can be hidden, in case the discount is equal to 0 and you set to hide zero discounts in Settings.
Memo & Actions
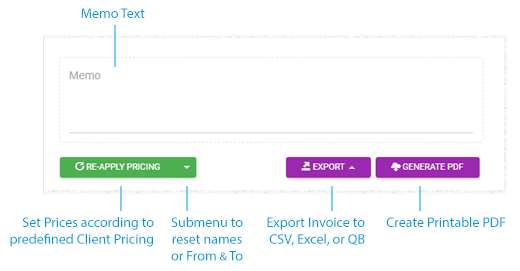
For notes, you can utilize the memo. Below the memo, you will find "Re-Apply Pricing" button. Clicking it will reset the invoice prices to those specified for the client. From the context menu of the Re-Apply Pricing button, there are 2 extra helper functions:
- Re-Apply names and descriptions - to reset item names & descriptions, as specified in the client pricing
- Re-Apply From & To Address - to reset From & To, as specified in app settings, and client settings
Totals
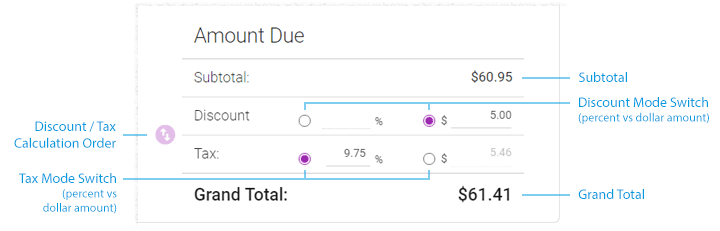
As all items of the invoice are priced, subtotal will be calculated automatically. You can specify invoice discount using dollar amount, or percent of previous subtotal - discount can either be applied before, or after tax. Use up/down button to change the order of totals.
Tax is applied automatically upon invoice import, and can be specified as per client, as well as company-wide percent. Go to client settings to specify the clients custom tax, or apply global tax in the settings section.
Print Invoice
After all numbers have been applied to the invoice, it is time to show it to your clients.
You can print the invoice using Generate PDF button in the memo section. You would need a PDF viewer to open it, though good news is every modern browser including Chrome & Firefox do have an embedded PDF preview feature which eliminates the need for 3rd part PDF viewer. If you are using a dated browser, or it does not work as desired - you may still utilize another application to view & print the invoice - in this case we recommend either Adobe Reader, or lightweight Sumatra PDF (https://www.sumatrapdfreader.org/free-pdf-reader.html )
Also, BSA offers several invoice layouts, which you can choose and preview in the application's Settings section. If you feel like you need to make changes to designs, you may contact us to discuss it.
Export Invoice
By default, you are able to export the invoice into CSV or Excel data format. Items will be placed into cells in a excel-way, so you can import it to your invoice software.
Also, there is an option to export the invoice to QuickBooks online. To do that, make sure you have set up the Quick Books Online integration .
QuickBooks exports can only be done manually (ie each invoice has to be exported separately) - to make sure your records are accurate and intact.